Wednesday, March 30, 2011

tiling...

..i started tiling the tub surround at the first floor bathroom.
the tiles are 6x8 glazed ceramic tiles that we got at lowes. 


i started by installing a temporary ledger at the bottom of the 2nd row of tiles- to get a nice level edge to start things off.   i will go back later and install the bottom row.  in this picture, you can see that i first just laid out the tiles to figure out the placement.


i also  picked up some glass mosaic tiles at lowes...these have both clear and frosted glass tiles in them.  i will use them to break up all of the white tile (and add a splash of luxury...ha!)
now, if you look closely, you will see that the mosaic tiles are glued to a mesh backing...but they are not straight and the spacing between the tiles is not consistent...this drove me crazy when installing the mosaic-i am worried that it will look messy after it is grouted- ah well...


so this is as far as i got today...you can see the red lines from the laser level- laser levels are fabulous for tiling, they are especially great for ensuring that the vertical joints align!
the little green dots are tile spacers, you can see where i went crazy trying to get the spaces in the mosaic tile band to be even!!!!!!arghhh!!!

so the field tile (white) are like $0.60 each and the glass mosaic is $9.00 for a 12x12 sheet.  by using a really cheap inexpensive field tile and only a small band of the expensive glass tile, we ended up with a budget friendly bath surround at just $162 for the tile...and $0 for the labor! 
:)


granite, marble, glass....and vinyl?

we selected the granite for the kitchen countertops...its called "venetian supreme"

next step was to select the backsplash.  we found 3 options at home depot.


1.  neutral beige 5/8" mosaic marble:

2. 1" funky glass mosaic:

3.  a combination of 5/8" funky glass and neutral beige marble mosaic:
which one do you think we chose?


we also picked up the flooring for the basement.  it is vinyl plank "wood look" flooring that we got at home depot.  we chose "teak"

it is a safe choice for a basement with a wet past. 
when we dug the hole for the sump pump- there was water in that hole, and we haven't had rain in a bit.

Saturday, March 26, 2011

dock that man a days pay for sleepin on the job...

okay...he's not sleeping, he's getting a ton of work done, like installing the kitchen cabinets!


we also installed light fixtures.  like this cutie patootie fixture


too bad it's in a spot that will rarely get seen!

Tuesday, March 22, 2011

holy stink batman!

i was mistaken thinking that i could work in the basement today...the fumes from the polyurethane were  incredibly strong, even in the basement...i could even smell it when standing outside.  so i held my breath, jumped inside, took a few pictures, then went home!  


scott, on the other hand...braved the 45 degree weather and poured the concrete footings for the deck...so thanks to him, some progress was made today!


Monday, March 21, 2011

wow wow WOW

the hardwood floors look AMAZING!

this is a photo of the area of the floor that was patched in (taken just after it was sanded)

this is the before photo!
did i mention, wow!


here you can see the difference that the polyurethane makes on the red oak

in case you missed it

and this is what it looked like just yesterday! 

most of the new kitchen needed new hardwood flooring- it has all been patched in (this photo was taken just after it was sanded, but not yet given a coat of polyurethane)

and before...
not a great view of the floor, so here is a photo taken from the kitchen looking back towards the entry

wow!

Sunday, March 20, 2011

shutters

we promised that when the snow melted we would install the last of the shutters, well- here it is, the big day!


gorg...


so now, the first and second floor ceilings and walls have all been painted and are ready for trim, interior doors and tilework.  but first, on monday the hardwood floors are scheduled to be refinished.  it is a three day process of sanding and finishing, sanding and finishing, and sanding and finishing. 

in the meantime, we will be painting the basement and possibly working outside (weather permitting)!

Saturday, March 12, 2011

plastered!

abstract art?

nope! just the walls- after they have been "mudded" and sanded

and now every surface in the house is covered with a fine white dust

view towards the entry and part of the kitchen

maybe i should have cleaned up before i took the pictures


this is the north wall of the new kitchen...where there will be full height pantry cabinets and the fridge (dining room is to the right)

and the south wall of the kitchen

dining room, ready for paint!

the fireplace wall...those boxes in the right of the photo contain the kitchen cabinets, which are currently taking up the living room and study- waiting to be installed!

new plaster has been blended into old plaster...seamlessly- so smooth!

the wallpaper left a grainy residue on the old plaster walls, so we sanded those too, lightly

this is the second floor hall with the new entrance to the bathroom
that hole in the ceiling is the attic access hatch!


a couple of views of the second floor bathroom:

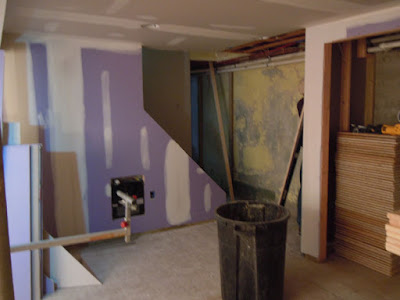
and hello!  the new basement:
with its purple mold-resistant drywall


a (blurry) view back to the stairs- with closets to the right (can you find scott in this picture?)
that stack of material in the closet is the dri-core subfloor that we will soon install.  it basically is particleboard that has a plastic bottom surface with built-in plastic feeties that raise it off of the floor- its a great material to install over slabs/basement floors and it provides a little peace of mind since this basement has a history of being wet!

you can also see in the picture that we kept the bottom edge of the drywall up off of the slab by about 2"- just in case!

we had some left over mold-resistant drywall, so we decided to install it on the utility room side of the partition (rather than lug the drywall back up the stairs- back into the truck- and back over to lowes!).
definitely nicer than leaving the studs open.  this area is the laundry area and we envision cabinets and a countertop against that wall- that is why we located the receptacle at 'above counter height'.   let's see if we have any money left in the budget for cabinets!


the snow is finally melting, and the deck framing is now visable...time to install the deckboards!
and that is our new gorgeous electric meter...200 big ass amps!


we have installed all of the new electrical devices too
phew, that is it for now...
:)
Related Posts Plugin for WordPress, Blogger...